Halloween nails give you an easy way to show off some seasonal style without needing a full costume. You can keep things simple with classic colors or add a playful twist with themed designs that match the mood of October.
With just a few tools and a little creativity, you can create designs that feel festive without taking hours to finish. From timeless black and orange looks to lighthearted patterns, each idea keeps the process beginner-friendly while still looking polished.
1) Classic Black Matte Nails with Orange Accent

Black matte nails give you a sleek and modern base that feels instantly tied to Halloween. The flat finish keeps the look simple while still making a strong statement.
You can add a single orange accent nail to break up the dark tone. This small pop of color keeps the design festive without being overwhelming.
Switching which finger gets the orange accent can change the whole vibe. Some people like it on the ring finger, while others prefer mixing it up.
2) Pumpkin Face Nail Art

Pumpkin face nails give you an easy way to bring Halloween into your manicure without going over the top. You just need orange polish, a fine brush, and black polish for the facial details.
You can paint one accent nail with a jack-o’-lantern face or add small pumpkins across multiple nails. Keeping the designs simple makes them quick to do while still looking festive.
If you want a playful look, switch up the expressions on each pumpkin. A mix of smiling, spooky, and surprised faces adds variety without extra effort.
3) Spider Web Design on White Base

Start with a clean white base coat to give your nails a bright backdrop. This makes the black web lines stand out clearly without looking too heavy.
Use a thin nail art brush or a fine-tipped pen to draw straight lines outward from one corner of the nail. Connect them with small curved lines to form the web.
You can keep it simple with just the web or add a small black spider for extra detail. A glossy top coat will seal the design and help it last longer.
4) Glittery Orange Tips

You can keep things simple but still festive by adding orange glitter to your nail tips. The sparkle gives a nod to Halloween while staying neat and easy to wear.
Try pairing the glitter tips with a clear or neutral base so the color pops more. This style works well on both short and long nails without looking heavy.
If you want extra detail, add a thin black line under the glitter edge. It gives the manicure a sharper finish and ties in the Halloween theme.
5) Ghost Silhouette Nails

You can keep things simple by painting a neutral or dark base and adding small ghost shapes in white. The contrast makes the design easy to see without looking too busy.
Try using a thin brush or nail stickers if freehand painting feels tricky. Both methods give you clean ghost outlines that still look playful.
Mix in a few accent nails with tiny stars or moons to tie the theme together. This keeps the design light while still feeling seasonal.
6) Black Cat Nail Decals

Black cat decals give your nails a quick Halloween twist without needing advanced painting skills. You just press them on and seal with a clear top coat.
You can keep the look simple with tiny silhouettes on a neutral base or go bolder with glitter polish underneath. Both styles keep the design easy but still festive.
Mixing a few accent nails with cats and leaving the rest plain keeps the manicure balanced and not too busy.
7) Simple Candy Corn Patterns

You can keep candy corn nails as easy as painting three stripes: white at the tip, orange in the middle, and yellow at the base. The straight color blocks make this design quick and beginner-friendly.
Try a gradient blend if you want a softer look. Sponging the colors together gives a smooth transition that still keeps the candy corn vibe.
Adding tiny pumpkins, ghosts, or black doodles on one accent nail makes the design a little more playful without much extra effort.
8) Bloody Drip Effect

You can get a spooky look by painting your nails with a light base color and adding red polish near the cuticle. Let the polish drip downward so it looks like fresh streaks of blood.
Try mixing glossy and matte reds for more depth. Vary the length of each drip so the design feels natural rather than uniform.
A clear top coat seals the design and keeps the shine. This simple technique works well on short or long nails.
9) Skeleton Hand Outline

You can sketch thin white lines over a black base to create the look of finger bones. The contrast gives a clear skeleton hand effect without being too busy.
Try keeping the lines simple if you want a clean design, or add tiny joints for more detail. Using a fine nail brush makes it easier to control the shapes.
This style works well on both short and long nails, so you don’t need extra length. It’s a quick way to get a Halloween-ready look without heavy designs.
10) Glow-in-the-Dark Nail Polish

Glow-in-the-dark polish makes your Halloween nails look different depending on the light. During the day, you’ll see the regular color or design, but once the lights go off, the glow effect kicks in.
You can layer it over a solid base or use it for small details like stars, spiderwebs, or tips. A couple of coats usually give the best glow.
If you want more variety, try stickers or decals that glow under blacklight. They’re easy to apply and give your manicure a quick upgrade without much effort.
11) Mummy Wrap Nails with White Stripes

You can get the mummy look by painting your nails a solid base color, usually black or neutral, and layering thin white stripes across them. The uneven lines give the effect of wrapped bandages.
Adding two small black dots for eyes makes the design more playful. Some people even stick on tiny decals or googly eyes for extra detail.
Keep the stripes slightly irregular so the style looks less polished and more like real wrappings. This simple technique works well whether you’re doing your own nails or heading to a salon.
12) Witch Hat Accent Nails

You can keep things simple by painting a dark base like black or purple and adding small witch hats on one or two nails. A thin brush or nail art pen makes it easier to draw the triangle shape and band.
Try adding a pop of orange, gold, or glitter for the hat’s buckle to give it a seasonal touch. This detail works well on both short and long nails.
If you prefer something subtle, place the hats near the tips instead of covering the whole nail. It gives a playful Halloween vibe without being too bold.
13) Polka Dot Pumpkin Nails

You can give your nails a playful Halloween twist by mixing pumpkins with polka dots. A neutral or sheer base makes the orange dots pop, giving the look a clean finish.
Add tiny black details to turn some dots into mini jack-o’-lanterns. This keeps the design festive without being too complicated.
Using a dotting tool helps you get even circles, but a bobby pin works just as well.
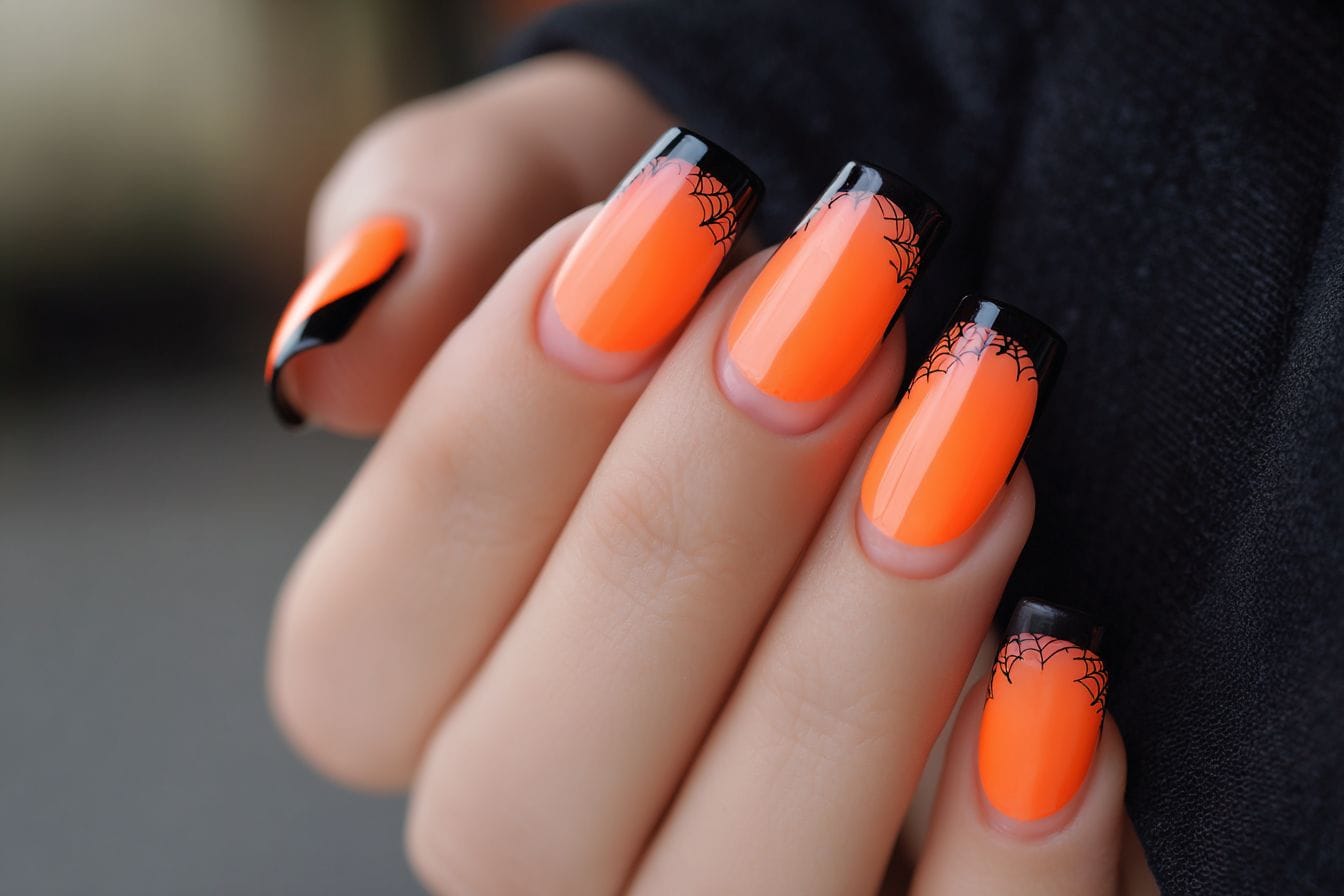
14) Orange and Black French Tips

You can give classic French tips a Halloween twist by swapping the usual white for orange and black. The sharp contrast between the two shades makes the design bold without being too busy.
Adding small details like bats, pumpkins, or spider webs on one or two accent nails keeps the look festive. You still get the clean lines of French tips, but with a seasonal edge.
If you prefer something simpler, try a gradient effect where orange fades into black at the tip. This keeps the style sleek while still tying into Halloween colors.
15) Bat Silhouette Nail Art

You can keep things simple by painting small black bat shapes over a neutral or dark base. The contrast makes the design easy to notice without feeling too complicated.
Try pairing the bats with a matte background for a cleaner look, or use a glossy finish if you want a bit more shine. Both options work well and don’t take much time.
Adding a moon accent on one nail can make the bats feel more seasonal. You still get a festive design while keeping the overall style minimal.
16) Skull and Crossbones Design

You can give your nails a spooky edge with a simple skull and crossbones pattern. A dark base coat like black or deep gray makes the white skulls pop clearly.
If you want something less harsh, try pastel backgrounds with small outlined skulls for a softer look. This works well if you prefer a cute but still Halloween-appropriate style.
Adding the design to just one or two accent nails keeps it easy and low effort. This way, your manicure feels festive without being too busy.
17) Spider Nail Stickers on Clear Base

Clear nails with spider stickers give you a simple yet striking Halloween look. The transparent background keeps the design light, while the dark spider shapes add the spooky detail.
You can place the stickers on just one or two accent nails, or spread them across all fingers for a bolder style. A glossy top coat helps the stickers stay put and adds a smooth finish.
18) Candy Apple Red Nails

You can never go wrong with a classic candy apple red for Halloween. The bold shade gives your nails a polished look that works with almost any costume.
Try keeping the color solid for a simple style, or add small details like black tips or tiny white dots for a playful twist.
If you want something seasonal, a glossy finish makes the red look richer and ties perfectly into fall themes.
19) Haunted House Silhouette

You can create a haunted house silhouette by painting a dark background, like black or deep purple, and adding a simple house outline with a thin nail brush or nail pen.
Adding small details such as windows, a moon, or a few flying bats makes the design more recognizable without being too complicated.
If freehand drawing feels tricky, you can use decals or stickers to get a clean haunted house look quickly.
20) Tombstone and RIP Lettering

You can turn your nails into tiny grave markers with simple gray polish as the base. Add black details to mimic stone texture and finish with “RIP” lettering for a clear Halloween vibe.
A thin nail art brush or stamping plate can help you keep the lettering neat and readable.
If you want variety, mix a few nails with tombstone shapes and others with small bats or spider webs. This keeps the look fun without being too repetitive.